Monday, July 14, 2014

Completing the Extensions and Final Details

Now that I have the base sub-assembly together and the table top assembled, it's now time to bring the two together and complete the extension wings for each side.

The picture above shows the mock-up of the extension wing and table top end piece.


You can see the table top end piece better from this view with the sliders below.


The extension sliders are supported by the table top.


Here I added a piece to dress up the edge and protect my legs from the sliders.


This is a mock-up of the entire table. It's going to be big! (I have the sandbags holding down the table top for mock-up.)


And the side view.

Thursday, June 19, 2014

Starting final assembly of the base

Now the fun begins!
I have completed sanding all my components with 80 grit. I have also test fitted all my parts to make sure there are tight and flush joints. I have also prepared all the fastener holes and locations.
With all that complete, now we can start glue up and assembly. Just a reminder, gluing is more important than the mechanical fasteners! A glued joint with be stronger than a mechanical joint, so glue every joint.
Okay make sure you have your:
Tape measure
Framing square
Clamps
Glue
Damp sponge with water bucket (for cleaning up the glue squeeze out.)
Screw driver or Impact driver
All fasteners required

Now take your time and work in small assemblies. I choose to do the bottom first and then work my way up (you can do it any way you like, sides first, center first, etc..)


As you can see in the picture above, I also added sand bags to assist with holding my parts in a flat square position. Also I don't like it touching my garage floor, so it's on riser blocks too. Take your time to insure squareness and everything is in 90 degree angles. What is not pictured here is that I did use clamps to help square everything before applying the sand bags.


As you can see above, I worked my way up the table base assembling. The coffee can is my water bucket and sponge for cleaning up the glued joints.
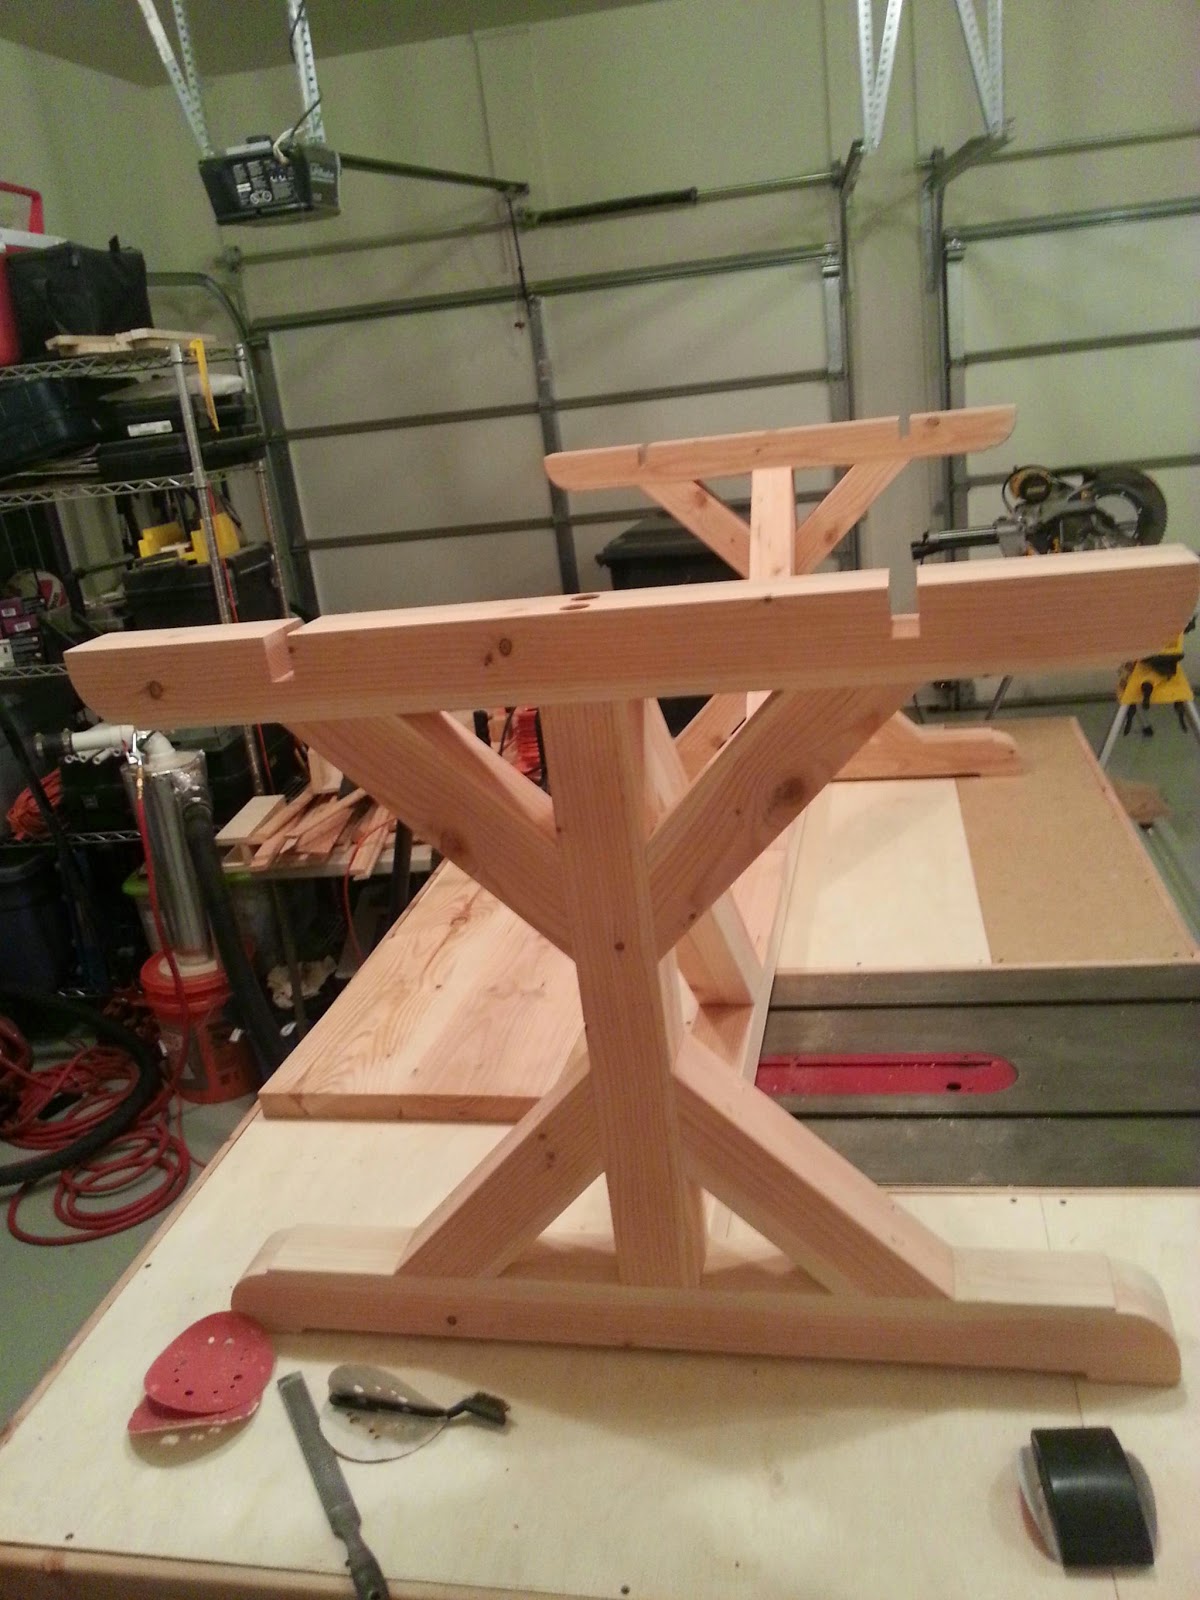
Below is the base fully assembled. Notice the notches at the top for the extension to slide through, the seamless joints, and that all the screw holes have been plugged to make them less noticeable. I also tried to highlight what I thought were some of the best faces of the wood grain and character.


Next step was to take a wood rasp and 80 grit sand paper to round over all the spots that I couldn't get with my router. I also sanded any remaining glue spots, drips, or blemishes.


Now it's starting to look like something! Stay tuned...

Tuesday, June 10, 2014

Preparation before final assembly

While it's time to get back to work after a holiday week off.
At this point I have all my pieces almost ready to assemble but I need to do a few things first before that.
It is easier to round-over or ease the edges of some of my pieces now before assembly. But CAUTION, be very selective of which ones. I eased all the braces and not the column or feet because I wanted it to have a nice tight joint where they meet.


Next is the part that I have been dreading, sanding, sanding, and more sanding! In order to achieve the finish I am looking for, I need to sand with 80 grit to generally shape and remove glue or blemishes. Then sand with 120 grit to remove those rough scratches. Then sand with 220 grit to get the final feel that I wish to have. After that I need to remove the dust with a tack cloth or mineral spirits. Then apply the wood conditioner, then the stain, and finally the stain polyurethane. 
I also made a test sample because I was matching some existing chairs that we really liked. (I will show in another post.)


One other component that I haven't shown much of is the table top, end pieces, and extension wings (as seen below). And these require the same processes as the rest, sanding, sanding and more sanding...

Thursday, May 22, 2014

Base Assembly

I have decided to make all my lower pieces dimensional 3" W by 3" D. I started with ripping my 4x4's I made down to just about 3-1/16" width.


I then removed a 1/32" on each side with my jointer to smooth the surface. The width is critical to match the 
depth.


Once I processed all my stock I then make a layout to determine which surface I want as the face to my legs and cross members. I try to match color, graining, and some characteristic, like knots, to get the overall effect I want. I also use this to determine spacing, think about how I am going to use fasteners, if I will conceal or expose them, how much over hang do I want for the table top, how can I disassembled to make moving easier,

Tips: Your eyes are the best tools you have whether it's for alignment, design or judgement. Use them and protect them, always!


Tip: Taking the time to setup jigs will make you time and your finished product worth it! I setup this drilling station for the 4 angled braces on each leg. I tapped them first to later use a 3/8" drill bit later. the reason is for wood plugs to conceal these holes since these will not be needed to disassemble later.


Next will be finishing and sanding preparations plus the cross member installation.
Other things to consider: table extensions system, table extension wings, overall table height (30"), fasteners

Thursday, May 15, 2014

Table Foot Design

Below are the tools that you'll need to complete this part. (It's easier than you think!)
Miter Saw
Circular Saw
Coping Saw
Small Hand Saw
Wood Rasp
Orbital Sander
Pencil
Speed Square


Here is the design that I decided to go with for my table foot. I made a template out of some scrap plywood so that I can trace and flip to all 4 corners (front and back sides) of my legs. Start by tracing your template on one side. Use the speed square to draw a matching reference line across the top. Then trace the template on the opposite side.


Now you can move to removing excess material with the miter saw. I started with a 45 degree cut followed by a 22.5 degree cut. I then use my speed square and circular saw to cut a series of slots at the top of my design and to make room for the coping saw blade. See below.


I used the coping saw to knock off the top piece of bulk material, as shown from above and below pictures.


Once that was complete, I used an orbital sander with 80 grit sand paper to gently remove the remaining material to the pencil line. Making sure that both sides match.


And this is the final product!


Next is the base fit-up and assembly. 

Wednesday, May 7, 2014

Table Top

The table top requires 5 boards at 8" wide by 70" long. I cut mine a little longer at 71" just so I can flush up the ends at a later time.
Tips: The 2 boards on the outside edges I left a little wider than 8" due to shrinkage when gluing and clamping. About an extra 1/8" for each side. I did achieve a perfect 40" width that was desired.


I lined up all the boards and clamped them lightly to mark the dowel holes across all boards at 10" apart. I purchased a dowel drill jig to help with alignment and marked the depth of the hole plus the jig on the drill bit.


After drilling the dowel holes I made a dry fit to check everything. I did find that I did not clean out 2 hole so the boards did not squeeze together tightly. Once everything was fitted and all the clamps and dowels are where I needed them, it's time to glue!
Tips: Test fit and measure everything. Make a dry run of clamping placement and pressure; I have 5 bar clamps on the top and 5 on the bottom. Apply clamps at joints on each of the ends of the table top to ensure alignment and flatness; 4 joints so an extra 8 C-clamps. Don't forget to use dunage between your work piece and the clamps for protection.


With yellow carpenters glue you should have about a 5 minute working time so you need to move quickly to apply and spread your glue. I let my table top sit in the clamps to dry for 24 hours.
Next is the base assembly. 

Tuesday, May 6, 2014

Material Processing

So I picked up about 90% of the material I need for this project. As I mentioned before the 4x4s in Douglas Fir (untreated) don't exist in my area so I made my own (below). It's nice to have lots of clamps, lots of glue, and do them all at once. I started with 2x8's and glued them together. Then I ripped them in half with the table saw and that is what you see here. I then cut to the lengths I needed according to my cut list (with some extra for length for tight joints).
When you get a gluing surface with tight clamps you should end up with a joint that looks like this. Almost invisible. 
Below, on the left is my table top material, cut to length, and my base material cut to length on the right. Also, I like to keep my material in order. The table top material to the far left is my unprocessed stock and next to it is the processed material. I group my base materials to the far right and separate it by legs 1 & 2.
Helpful hints: Number the end of your pieces according to your drawings so you know where they go when you assembly them. Never put your material on the floor. You risk picking up stones and dirt in your material. Use dunage under your material to store it.